


Yearning to learn to strum a tune? Guitar teacher Kirk R. shares a perfect first lesson in strumming a guitar…
Most of the songs that my guitar students want to learn consist largely, if not completely, of strummed chords.
While most students are able to pick up both simple and more complicated rhythms, or strumming patterns, often I notice that beginners have a hard time keeping track of where the beat is and really getting into the groove of the song.
It’s also common that I see musicians of all levels who have a difficult time coming up with new strumming patterns of their own.
I have a simple system that I introduce to students with either of these problems and have seen a lot of improvement on both fronts. Let’s get started!
How to Strum a Guitar – Getting Started

Make sure that you have some blank paper, something to write with, and your instrument handy. For those of you who are used to reading rhythmic notation (quarter notes and eighth notes), begin by writing four quarter notes down, with some space in between.
If you’re not really comfortable reading note rhythms, go ahead and draw four down arrows.
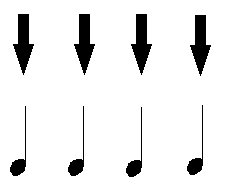
Now pick your favorite chord (or just start with open strings) and strum four even chords, all with down strokes.
It’s important that throughout this exercise, you keep all your strumming even. Those down arrows or quarter notes represent those four chords that you just played.
How to Strum a Guitar – Up Strokes and Down Strokes

If you watch closely as you strum through the first exercise, you should notice that between each strum, your hand does something very simple, but very important.
After each down stroke, before the next, your hand must come back up!
I call this the “silent up stroke.” If we were to draw these into our note/arrow diagram, it might look like this:
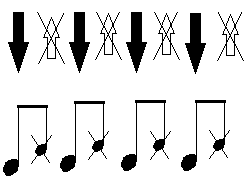
The idea of the “silent strum” is important in keeping track of the groove and coming up with your own strumming patterns using this system. You should follow this silent strum visually and make sure that you’re keeping your hand moving consistently, not pausing after each strum before the return.
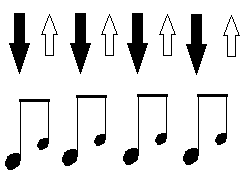
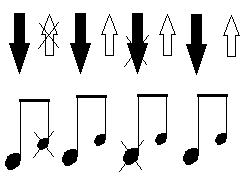
Now we can go onto to turning the silent strum into a real strum, so you’ll have four down strokes, each followed by a slightly less accented (a bit quieter) up stroke.
We can draw this into our diagram either with up arrows after each down, or with an eighth note between each of what were quarter notes. Since your hand has already been doing the motion, it should be a small step to just lower your fingers or pick down onto the strings.
From here, write down a full cycle of strums (four downs and four ups). Now, let’s cross off a couple of our up strokes:
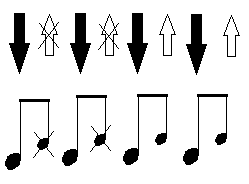
It doesn’t really matter which ones you cross off, but the idea is to just try out what’s on the page. The pattern above would be strummed with a down stroke, “silent” up stroke, down stroke, “silent” up stroke, down, up, down, up. While this may seem like a limited approach, when you start crossing off a combination of down and up strokes, the results can be very original.
One thing to note, is that if you have a down stroke and an up stroke both crossed off next to each other, it will seem silly to do the two “silent” strokes back to back.
When first trying it out, do that extra motion, however silly it seems.
The physical motion is useful to keep time and the groove. Once you have a good grasp on it, you can do away with the full “silent” strokes, but I still find it useful to make a small motion on my strumming hand, like a miniature “silent” stroke, just to attach a movement to the rhythm.
While you’re practicing these, as well as applying them when writing a song, just continue repeating the pattern without pause.
I like to start with four beats, with a down strum on each, but you can add variation in the number of beats as well as where your “silent strums” are.
Understanding Guitar Strum Patterns

This is an easy way to come up with your own original strumming patterns, but what if you’re not really into writing your own songs? If you just want a good visual way to better understand the strumming patterns that you hear in your favorite songs.
First try listening to the song and tapping your foot along with it. How many beats do you hear grouped together?
In the majority of songs you hear, the beats will be grouped in threes or fours, so that’s a good starting place. From there, try just playing air guitar along with it, with a down strum on the strong beats and see where you hear the chords in the song.
Try writing these down and playing from your notes a few days later, without first listening to the song. Does it sound right?
Being able to look at and write down these patterns will help ingrain them in a different part of your brain and give you a better understanding of where the strong beats are at while you’re playing them.
If you have any questions or ideas on how to expand this lesson, post a comment below or click the Ask-A-Question button on my profile. Happy strumming!
 Post Author: Kirk R.
Kirk is a classical, bass, and acoustic guitar instructor in Denver, CO. He earned a bachelors of music in Guitar performance at The College-Conservatory of Music in Cincinnati and he is currently pursuing a masters degree in performance. Learn more about Kirk here!
Photo by Matt Preston


Megan L.