

So You Want to Know How to String a Violin? There’s no reason to get high strung over a broken string on your instrument. It’s always a little bit scary when you hear the thunderous twang of a string giving way under high pressure.
After the initial shock people start realizing they have no idea how to string a violin. Other times, it’s a sad surprise when you open your instrument for another great practice session and see the remains of your broken string curled around the peg box.
Well, this article will put your mind at ease and show you the easy steps to replacing that broken string.
A Step By Step Guide to Stringing a Violin
Step 1: Finding a Replacement String
First, you need to get yourself a replacement string for your violin. You need to make sure that it is the proper size for your instrument. If it is a full size violin, it will be designated as 4/4. Three quarter size is ¾ and half size as 2/4.
Other measurements follow a similar naming convention. If you are unsure, what size violin you have the best thing to do is take it into a violin shop or the store you are renting your instrument from and have them verify the size.
Step 2: Removing the Broken String Remnants
With the new string in hand you are now ready to proceed. Lay down a soft towel on your kitchen table or desk and lay the violin down on it. Remove the broken string remnants from the instrument and discard or hang them up on a wall as a trophy!
Step 3: Finding the Correct End
Start with the tail piece behind the bridge. For most student violins there are four fine tuners integrated into the tail piece.
Each tuner has a pair of hooks that are parallel to each other that form a slot. Strings have two ends. The one you want to use for this is the one with the metal ball attached to it.
Step 4: Inserting the String
Just up from that is a wider portion that has colored wrapping around it than the skinny naked string. Insert the skinny string part into the slot, then pull the string towards the bridge until the metal ball is engaged FULLY under the hooks.
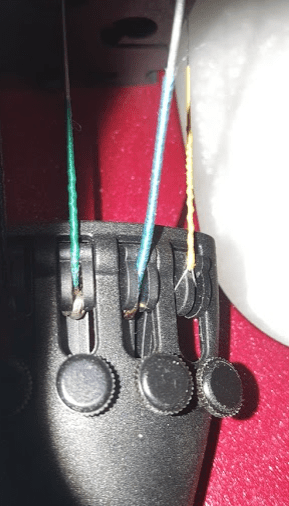
One of the most important things about learning how to string a violin is that last bit. It prevents the string from snapping out dangerously once we put it under pressure.
Step 5: Examine the Peg
Now, examine the peg and make a note of where the hole for the string is. Sometimes there is more than one hole drilled. You can use the hole that allows you to wind the string the most efficiently.

Make sure the peg is seated in the peg box hole loosely. Don’t jam it in. Insert the end of the string into the hole in the peg and make sure it protrudes out the other side about a quarter inch to half an inch. It depends on the amount of slack you have in the string.
At this point the string is very loose and that is good. Before tightening make sure the ball end is still engaged properly in the fine tuner. If not, go repeat those steps.
Step 6: Tightening the Peg
Now turn the peg towards the scroll, clockwise or away from the fingerboard. Always tighten in that direction.

As the string tightens you want to make sure it winds around the peg towards the side of the peg handle you are turning. Try not to let the string overlap itself. Once the slack is taken up in the string you will want to check some things before making it tight.
Make sure the string is in the groove at the nut at the end of the fingerboard next to the peg box. On the bridge side make sure it is in the groove on the bridge. Take care not to move the bridge or alter it.
Some strings, like the E string, may have a small plastic or felt piece on the string. This goes under the string at the groove on the bridge. This prevents the string from cutting into the wood. Don’t leave it loose as it will cause an annoying buzz.
Finally, for safety, make sure that the metal ball is fully engaged under the hooks on the fine tuner.
Step 7: Ensuring the Correct Alignment
Once everything looks good it’s time to start winding the turning the peg again. At this point as you turn the peg you need to push it into the peg box at the same time so it sticks properly.
If not, the peg will just unwind like a rubber band airplane and you get to start over. Violins are all about finesse, so don’t jam it in either to the point you can’t turn it.
Step 8: Tuning Up
Before reaching final pitch, check your string settings just like before. If anything has slipped or moved, unwind the peg a little and fix things then proceed to tune the string to the correct pitch.
Congratulations you now know how to string a violin!

Mark Williams