

Learning how to use Adobe Photoshop Lightroom is like creating magic in our computers. Recipes for repeatable effects called Presets, Collections to help us stay organized, along with robust Keywording assistance, are only a few of the magical tools in Lightroom. We’ll go deeper here to see just how powerful this program is for our photography.
Review of Key Features

In our last article, How to Use Adobe Photoshop Lightroom: A Beginner’s Guide, we learned the options to tag your photos for easy sorting. Keywords used like a Google search saves time when looking for specific images. Collections are like your playlists of songs in a given genre.
We also learned that Lightroom provides non-destructive editing by attaching sidecars to the original file, as well as unlimited undo’s. File conversion and exporting told us how to get our work files into final published images for the world to see.
Please note that we will be discussing Lightroom Classic in this article. Lightroom Mobile and Lightroom, while similar, have different capabilities. You can make them work together by utilizing the Adobe Cloud to store your images.
Going Deeper
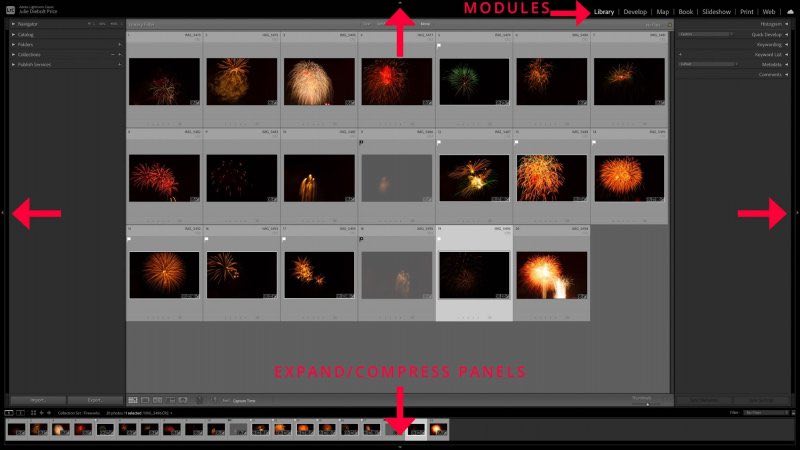
Modules
The diagrams of the Adobe Photoshop Lightroom workspace below displays the Modules menus, expanded panels, Collections and Collection Sets, and working within the Develop module.
Most of the work is done in the Library and Develop modules.
- Library – View and organize your photos, Import and Export
- Develop – Edit and enhance your photos
- Map – Shows on a map where you captured your photos (set up GPS on your camera)
- Book – Presentation
- Slideshow – Presentation
- Print – Presentation
- Web – Presentation
Panels
Each edge of the screen shows a little triangle at the middle sides. That triangle, when pressed, will hide or expand the panel where it’s stuck. See image above.
Each panel is divided into sections with a name and triangle next to it. Click on the triangle, and it will expand down with all the tools associated with that section.
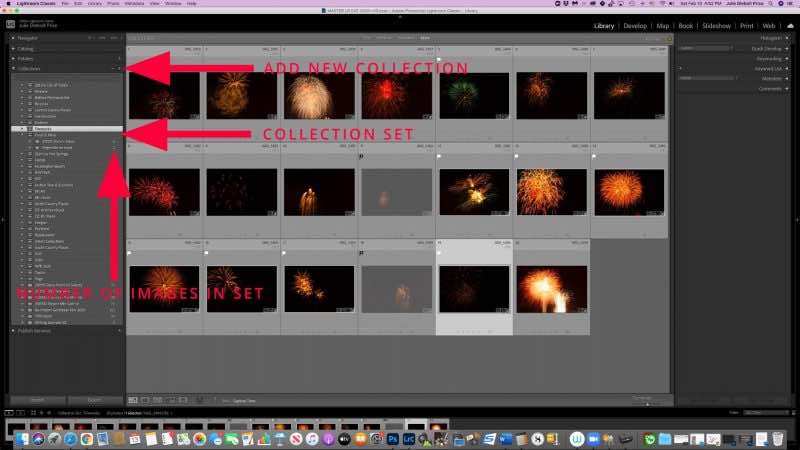
Creating Collections
No matter how cluttered your hard drive is, you can still find your images with the effective use of Lightroom. It takes just a little bit of time to organize, and once you do so, it’s easy to keep up.
Adding images to Collections doesn’t move them from where they are on your hard drive from the Library module. It merely puts a tag on them in your Library. Similar to creating a playlist of your favorite songs from your music library.
Select the + sign in the top right of the Collections panel to make a new collection. You can click on the Grid View images in the workspace and drag them onto the panel’s Collection (name). You will notice the number of pictures in the Collection appears to the right of the name.
To remove an image from a Collection, highlight it and hit delete on your keyboard. The photo is deleted from the Collection, not the Library nor your hard drive.
The same photograph can appear in more than one collection. You can organize all of your images in any way that is meaningful to you.
Collection Sets
To fine-tune your organization even further, create a Collection Set and place Collections inside of the set. It’s like a file cabinet with separate drawers for each collection of pictures.
Inside the Collections panel, you can search for specific collections. You can very quickly get to that collection without having to remember where it resides.
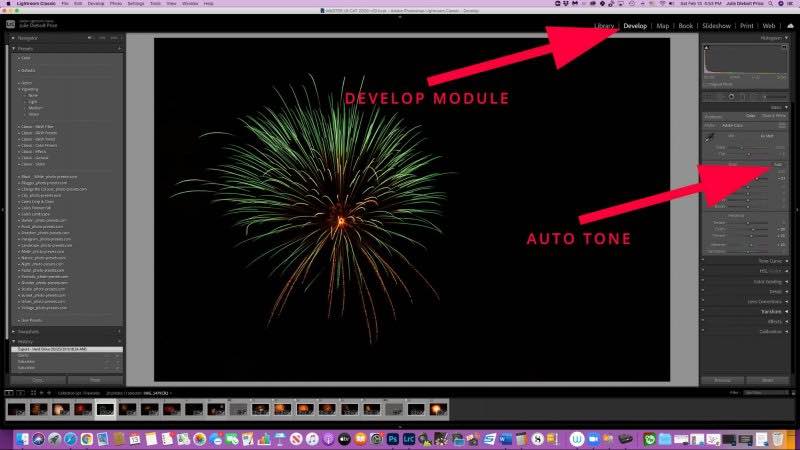
Using the Develop Module
Lightroom can adjust any picture. It doesn’t matter if you used a big fancy camera or shot on your mobile device.
Select the Develop module and become familiar with the right-hand panel. That’s where most of the action happens.

The first step to adjust your photo is to select the Basic panel. You might try Auto in the Tone section – it’s just above Exposure. If it’s not quite right, you can fine-tune the image by using the sliders to make further adjustments.
In our online lessons, we explore the Develop module extensively to see what the sliders accomplish, fix the perspective in an image, convert to black and white, and so much more.
Sizing Images
It seems that everyone needs to know how to size their photographs. Lightroom performs this function elegantly and effortlessly. The Crop & Straighten panel is also the place to straighten the horizon lines if they are crooked.
In the Develop module, select the Crop & Straighten panel. Notice the padlock (Lock icon), which is probably locked. The lock ensures your photograph is cropped in proportion to the original size. Click on the Lock icon to open it, and you can drag any edge of the crop boundary freely.
The Crop & Straighten panel also allows you to select a standard size such as 1×1 for square, 5×7, 8×10, etc. Note that each crop is different and that you can create a custom size.
Don’t forget to click the Done button to accept your changes.
Remember, cropping (resizing) in Lightroom doesn’t permanently change the file. You can go back later and change the crop or any other adjustment because of the sidecar files that make Adobe Photoshop Lightroom non-destructive.
Conclusion
We’ve gone deeper into how to use Adobe Photoshop Lightroom here. In our online lessons, we work with YOUR photographs to help you understand all that you can achieve and the magic you can create in photography.
As a beginner learning how to use Adobe Photoshop Lightroom, recognize that with more practice comes expertise. Don’t worry about making mistakes. It’s easy to recover from missteps because Lightroom is non-destructive and affords astonishing results.

Julie Diebolt Price