

The violin is a very challenging instrument to learn. There are many factors and reasons that play into this, but one of the big difficulties of learning is the violin bow hold.
At first, it may feel awkward and unnatural, and because of this, many students question if they are doing it right. For a student who is going through this, it is very important to understand that over time it will get more natural. Aside from that, the best thing for a student learning the violin bow hold is a clear, concise explanation from a teacher.
Standard Violin Bow Hold
There are several variations of the violin bow hold; I will be explaining the most standard one that is taught to classically trained violinists. It is important to keep in mind that everyone’s body is built slightly differently, so this bow hold might not work the same way for everyone. But make sure to trust in the process and understand that it will get easier over time. Once you’ve learned the proper technique, make sure you stick with it, and hold yourself accountable. You’ll thank yourself later.
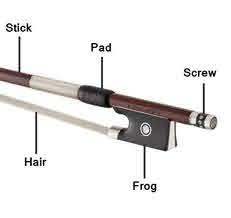
Before going into the steps of how to hold the bow, it’s important to identify the various parts. This is helpful not only when learning how to hold it, but also necessary for learning how to care for your bow properly. I’ve included an image with all the parts labelled:
How To Hold A Violin Bow:
Hand Form
Put your middle and ring fingers close together, and separate your pointer finger and your pinky from the two fingers in the middle. This should be a fairly natural hand position, and it mimics how your hands will be placed on the bow.

Middle And Ring Finger
Your middle and ring fingers will go on the frog of the bow but they shouldn’t overhang on the bottom of the frog, they should just be placed flush against it. This acts as sort of an anchor to your hand placement in relation to the bow.
Pointer Finger
Your pointer finger should be placed on the pad, in the middle of the finger. Many people find it comfortable to roll their finger slightly to the side, which will tilt your entire hand down towards the stick of the bow.
Pinky Finger
The tip of your pinky should rest on the screw. Some people let their pinky hang off the edge of the screw a little bit, which works too. The most important thing with the pinky is to keep it from bending downwards, because that could lead to tension.
Thumb
Your thumb should be placed in the indent of the frog of the bow, under the pad. The thumb should be bent outwards. This is very important, because bending it inwards could add tension, and even limit the length of your bow stroke.
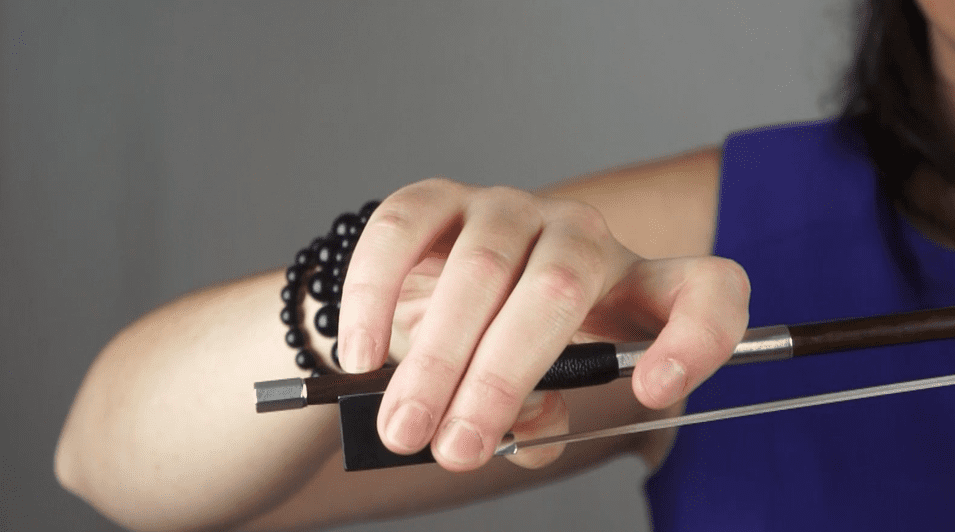
Now that you know where to place your fingers, look at this picture and observe what the correct bow hold technique looks like:
How to practice your bow hold
Now that you know how to hold the bow, the next step is to put it to practice. This is a long process, so it’s important to understand that it will come gradually over the course of your violin learning journey. One creative method that makes practicing the violin bow hold into an enjoyable activity, is practicing on something else, like a pencil or toothbrush.
This is something I often did when I was learning how to hold the bow. It’s helpful because you don’t have to worry about playing any notes, or what to do with your other hand. You can just mindlessly get used to the hand position while engaging in another activity. When you come back to the real bow, your brain and hand will be a little more accustomed to the position. Even to this day I often practice my bow hold while brushing my teeth!
Why You Need a Good Bow Hold Technique
A common question I get from beginner violin students is “Why can’t I just grab the bow with a fist? What’s so important about this bow hold technique?” Learning the correct bow hold is key while learning the fundamentals of the violin, because it will pave the way for your future violin learning journey and give you the opportunity to reach your goals.
This bow hold has been developed over decades and centuries of violinists from all over the globe. And it is used because it provides the best tone, most possibility of arm movement, and least tension possible. Learning the correct bow hold technique is incredibly rewarding and worth the work. But at the same time, it shouldn’t be a source of stress on a learner. The whole idea is to play without tension, so as long as you focus on that, the right technique will come over time.

Alani Sugar