

Welcome to Ukulele for beginners. I’m Reina, voice and ukulele coach on Takelessons. Today I’ll teach you the basic parts of your ukulele, how to hold your instrument, and how to play the 4 basic chords that will allow you to play hundreds of songs.
Ukulele Anatomy
Do you have your ukulele? Awesome, go ahead and grab it. We’ll look at the parts of your instrument now. Starting at the top we have the headstock. The headstock has tuners on it that we use to tune each string.
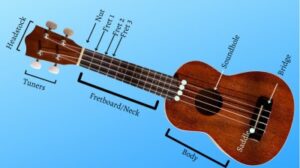
Next you have the nut. The nut works with the saddle to ensure that your strings make sound when you pluck and strum them.
Beyond that are the neck and fretboard. The frets on the fretboard are what you’ll use to build chords. As you play them the strings get longer and shorter, (show plucking as you move up neck and down) causing the strings to change pitch.
Moving to the next part of your instrument you have the soundhole. This is where the sound comes out.
Just beyond the soundhole are the bridge and saddle. The bridge supports the strings and along with the help of the saddle and nut it helps the strings make noise that the listener hears.
The body is the biggest part of the ukulele. It helps the string vibrations be heard. The body of your ukulele may be hollow or solid. It may also have a different curved shape from other ukuleles. The shape and size affect how the ukulele sounds.
Tuning Your Ukulele
Now that we’ve covered all the parts of the ukulele it’s time for you to tune your instrument. There are 12 notes in the musical alphabet, and the ukulele is tuned to 4 of those notes. Each note makes a different sound. The notes can make noise one at a time to create a melody, or work together to create a chord. Sometimes notes don’t work together and instead of beautiful music, you get discord.
If you want to play the ukulele correctly it is very important that you tune your strings to the right notes. Let’s tune our ukuleles now. Grab your uke and hold it with the soundhole facing you. Take a look at your instrument. Isn’t it a beautiful ukulele. LOL. Ok, Now turn the uke so the soundhole faces out. Tilt it so the headstock is on the left side of your body and the body and saddle are on the right.
*Note: Until you’ve played your instrument long enough to be confident tuning by ear, you’ll want to have a headstock tuner, built-in tuner, or tuner app available to help you. If your ukulele does not have a built-in tuner you can download “Pano Tuner” from your device’s app store. This chromatic tuning app will let you know when each string is in tune.
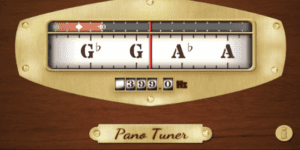
In this picture the ukulele player is tuning their 4th string to G. As you can see they are close, but not totally in tune yet.
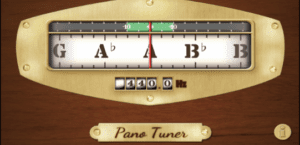
In this picture the ukulele player is tuning their 1st string to A. As you can see they are exactly in tune because the bar has turned green and is exactly in the middle.
Use the thumb of your right hand to pluck the top string. This string is called the G-string, or string 4. It should make the sound of G when you pluck it. Use your tuner to check that your G-string sounds correct. You can tighten and loosen the tuner attached to the G string to tune it. Once you have achieved the correct note, move on to the next string down. This is the C-string.
Using your thumb check that the C string is tuned to the correct note. Again, use your tuner or tuner app to ensure that you are tuned correctly.
Time to move to the next string down. Although this is the third string you are tuning, it is known as string 2 or the E string. And, You guessed it, it’s called the E string because it is tuned to the E note.
The last string we have to tune is the A-string. Using your tuner head and your tuner or tuning app ensure that the A string is tuned correctly.
Once all your strings are tuned your ukulele should sound like the ukulele in this video. https://youtu.be/7xKTKjwGCVg?t=66 You should learn to hum this tune with your mouth to get used to the way it sounds. Knowing the ukulele tuning song will help you tune your instrument by ear when you don’t have a tuer available.
You want to check your tuning before you play and everytime you change your strings. If you’re playing outdoors with the hot sun or if it’s chilly out you may need to check your tuning throughout your time playing, as the varying temperature can cause your ukulele wood to expand and contract, in turn causing your uke to become out of tune.
The 4 Basic Chord
Now that you know the anatomy of your uke and you have it all tuned up it’s time to learn the four basic chords! With these four chords you will be able to play hundreds of songs. This is because songs are based on chord progressions and many songs share the same chord progressions.
What are chords? Chords are 3 or more notes sounding together at the same time. With the ukulele, chords are shaped with your left hand and strummed with your right hand. Before we move on to actually shaping the chords we need to quickly go over the number names for each finger and each fret.
On each hand the pointer finger is number 1. The middle finger is finger 2. The ring finger is number 3, and the pinky is number 4. The thumb is called the thumb. In addition, each fret is numbered starting with the nut. (You can reference the above ukulele anatomy pic to see the frets.) The nut is also known as the zero fret. Next we have fret one, fret 2, fret 3, and so on. Remember these numbers, as we will be using them right now.
To play chords let’s start with the pacman shape. Make a little sock puppet/monster mouth with your hand. Now turn your hand towards the neck of your ukulele and eat your ukulele neck. Now slide your hand across the neck. Back and forth, up and down. Notice how your thumb stays in line with your one and 2 fingers. It is very important to keep your thumb position in this shape as you learn the 4 chords we will be working on today. Understanding and being confident with this starting hand shape will ensure that you don’t have pain and injury later in your ukulele career. It also ensures that you don’t have to go back and re-learn the basics later on.
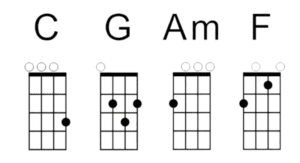
The first chord we will explore is the C chord. The C chord is shaped by sliding your 3 finger onto the 3rd fret of the A string. Strum the strings with your right hand. Congrats. You are playing the C chord.
Besides the C chord, the Am chord is the next most popular chord on the ukulele. Partly because it’s easy to shae and play. Partly because the Am chord is used widely in popular music. Using your pacman shape slide your 2 finger to the 2 fret of the G string. The top string. Once your left hand is in position, strum the strings with your right hand.
*Note: When strumming with the right hand you should strum towards the bottom of the neck and fretboard. Do not strum your ukulele with the finger placed over the soundhole.
Keeping your hand in the Am shape, add your one finger to the first fret of the E string. This is the F shape.
The last chord shape to learn is the G chord. This chord is a little more difficult for beginners, but with some practice you’ll master this chord in no time. Starting with your hand in the C shape, slightly pivot your wrist to place the 2 finger on the 2 fret of the A-string and the 1 finger on the 2 fret of the c-string. Lastly move the 3 finger to the 3rd fret of the E string. You’ll notice that your thumb is in a different place than the other 3 chords. That is ok for the G chord shape
Alright! Nicely done. Transitioning between chords with confidence will take a little practice, but with time you will be changing chords like a pro. Enjoy your practice with these four chords and when you’re ready, check out 10 Ukulele Songs that you can play with those four chords, in the Takelessons Live course “10 Ukulele Songs for Children Under 10”. The 10 songs in this course are perfect for beginners. You can also learn and continue to grow your skill set with daily, live ukulele classes on Takelessons Live. Enjoy your practice!

Reina Mystique