


Learning how to improvise is often seen as a more advanced skill attempted only after you have mastered the basics. It is often clouded in mystery and seems almost like magic when demonstrated through a great improviser. However, we can turn that idea on its head and use improvising as a path to learning how to play an instrument, even from the early stages.
Humans are naturally improvisational (just think about how you like to move or even “drum” to songs you love), and we can use this natural ability to guide our playing and learning.
In this article, I will give you the tools to explore how to improvise from a basic level and show you a framework that can lead to you more advanced improvising down the line. We’ll start with explaining what improvisation actually is, and some different approaches that we can take as beginner or intermediate players. Using specific examples, we’ll see how to structure your improvisation and use your existing knowledge to explore sounds and techniques.
What is Improvisation?
Improvisation is simply creating something spontaneously. We all do it when walking, talking and playing music. Creating rhythms while strumming is usually the first place we start improvising. Instead of learning strumming patterns, we feel the beat and play around with how we feel that beat. That is improvising!
Notice that improvising means playing around with defined elements and either adding to or embellishing them or rearranging them to create something new. The point is, we start within parameters. For our context, let’s explore a specific kind of improvising where we will create harmonic embellishments and melodic ideas built of and around musical elements we already know – chords.
Finding Your Key
Chords are a great starting place for learning how to improvise. They provide a structure, both musically and physically, that contains the elements and parameters to play around with. First, let’s put our chords into context. Let’s take our most common chords: C F Am G. We can play hundreds or even thousands of songs with these chords. Here’s why: as you play these chords together, try stopping on any of the chords and ask yourself, “Does it sound complete if I end on this chord?”
Play this game enough and you will hear that the only chord that gives you a definitive feeling of ending is the C chord. This is the idea of playing in a musical key – there is a center chord or note that sounds like a resolution and the other chords and notes relate back to the chord or note to give us a sense of going away and then returning to the center. We all hear this, but you should practice actively listening to those moments in songs that give you a feeling of returning. (Hint: it almost always happens at the end of a song)
Build Your Own Scales!
Finding your chord center or key is important because that gives you the reference for exploring the sounds within the song. Try this: play a C chord and sing the note that sounds like it fits over the entire chord or feels like “home” – it should be a drone note that just works. Then use that note to sing a major scale. The major scale is the Do Re Mi Fa So La Ti Do from that song in Sound of Music – you know – “Do, a deer, a female deer, Re a drop of golden sun etc.”
We all know this sound. This scale is the building blocks for all the chords in the key, and each chord is made of at least 3 of the notes from the scale. This means that each chord is like a lens to hear the scale through at any given time, and we can play individual notes from the chord to sound good over the chord.
Simply pick individual strings while holding the chord shape and you are playing part of the scale. If you do this for each chord, then you are playing a different set of notes from the scale each time. Simply doing this can be a good start to improvising – just play 1 or 2 notes from the chord shape instead of strumming the whole chord and you have a hint of melody.
Using the Chord/Scale Relationship to Embellish Chords
Now, chords only give us 3 notes at a time, but the scale is made of 7 notes. We can find those other notes by simply moving fingers from the chord shape to reach other, nearby notes. For example, if I hold a C chord and remove the middle finger, then I have found the open D note which is not in the C chord but is in the C scale.
I can also move the middle finger to the 3rd string on the second fret. In the C chord, the 3rd string is open for the G note, but when I move to the 2nd fret, it is now an A note, which is not in the C chord but is in the C scale. By simply moving fingers around (taking it off, adding a finger, moving to another string etc.) I can reach the other notes in the scales that are neighbors to the notes in the chord. This leaves us with chord tone and neighbor tones from each chord shape.
Once you determine your key scale, those notes remain the same even while the chords change – the C scale is always CDEFGABC, even if I am playing C Am F or G chords.
As you move fingers around while playing each chord in a song, you are creating embellishments. You can still strum normally and add embellishments to your chord sounds, which give the song more texture and helps you sound more professional.
Go look at some videos of your favorite bands, and look at the singing guitarist or the rhythm guitarist. Notice the little movements their fingers make while playing recognizable chord shapes? They are simply moving fingers around to embellish the chords. Simple and effective, and created spontaneously on the spot – improvising!
C scale frets reachable from chords C F Am G:

Practice reaching the notes from each chord shape while still holding as much of the chord intact as you can.
Using Scale/Chord Relationship to Transition Between Chords
Once you get this idea, the next step is to add a transition melody leading to the next chord. It is the same game as embellishing except that you use the finger movements to physically lead you into the next chord. This linking of chords by melodic figures is fundamental to many styles of music and can really spruce up your playing by breaking up a strumming pattern to play individual strings, thus adding texture to your playing.
Here is a musical example from a famous tune, “La Bamba,” that does just that:
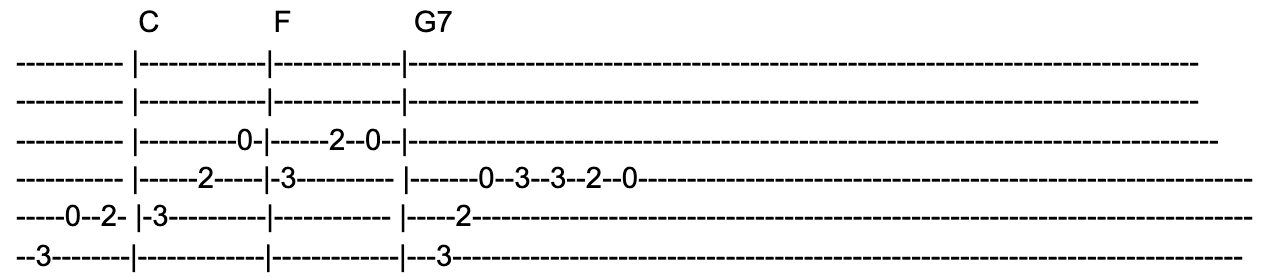
Each bass figure leads us into the next chord using just the chord tones and neighbor tones. Playing examples like this is a good way to get used to hearing and playing the idea, and can help prepare you to create your own movements leading into the next chord.
Exploring the Framework
The framework we have explored in this article for learning how to improvise can be summarized as playing chord tones (by playing the chords), moving fingers around from the chord to explore neighbor tones, and then using those to step into the next chord. In order to accomplish this, you must know what key you are playing in and find the correlating scale – all of this is done by ear and exploring with fingers.
This framework can lead you all the way into full-blown soloing if followed to its logical progression. Find new chord shapes up the neck, and explore finger movements from those chord shapes. Eventually, just think of the chord shapes to free up all fingers to move, while anchoring your playing from the shapes. This simple framework is anything but easy.
There are a lot of chords and shapes and scales to explore, and many different keys. I suggest sticking to common chord progressions in common keys when you’re first learning how to improvise (keys of C, G, D, A, E). Exploring one key and one position at a time until the movement becomes almost automatic. Remember, it is a journey!

Justin Martinez