
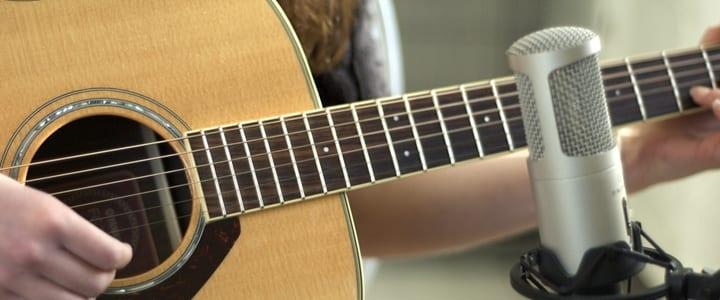

Curious about recording acoustic guitar tracks at your home studio? Check out these helpful tips for before and during the session from Perth Amboy, NJ teacher Jeff S...
If you’ve tried recording acoustic guitar before, there’s a good chance you know how demoralizing it can be to think you’ve captured a wonderful performance, only to learn later that it’s sonically flawed. I’d like to offer some tips, with hopes they will assist you in rendering consistently clean and clear acoustic guitar tracks.
Before you even begin, here are some tips for setting up:
- Find the place in the room that you feel your acoustic guitar or voice sounds best, make a mark on the floor, and also take detailed notes. Include the height of the mic off the ground, the distance between you and the mic, and the angle of yourself and the guitar in relation to the mic. Better yet, have someone take a picture of you recording in your “sweet spot.”
- Spend some time choosing and verifying the tempo at which you’re going to record the song. Experiment with a few different tempos until you find just the right one.
- Determine the mood of the song you are recording and base all your decisions around that. Is the guitar meant to be gentle? Aggressive? Graceful? Attacky? Both the guitar part and the vocal approach will fly or die by your accurate assessment of the mood!
- Record acoustic guitar and vocals in mono, as these are monophonic sources. Once you get a beginning-to-end performance of the main guitar part, you can think about recording it again and either using the second part to beef up the sound or run one guitar track on the left channel and one on the right. Some engineers like to record with two different mics simultaneously, pointing one at one part of the guitar and one at another part of the guitar. Experiment and see what floats your boat.
- Record both guitar and vocal without any reverb, effects, or EQ adjustments. Add what you wish after it, but cut the tracks dry. This gives you much more flexibility when you mix.
- Set your volume levels so that you don’t end up pushing the meter into the red more than once or twice per track (even that might cause distortion enough to ruin an otherwise good track) and then focus on maintaining that level and waveform size as you replay or re-sing the part.
- Count in one or two measures before you start recording the guitar part.
- Don’t have the volume of the click track up so high that it bleeds through the headphones into the microphone. It’s prudent to record with a click track, but you need to make sure it’s not so loud that the clicks get picked up in your vocal or instrument mic.
- Consider extra purchases. If your recording room isn’t soundproofed and you don’t have the time or the budget to make it so, don’t worry. There are several effective and reasonably priced options that will quell the bleed-throughs. Three you might consider are sE Electronics Reflexion Filter X Portable Vocal Booth (just under $125), sE Electronics Reflexion Filter Pro model (just under $250), or the Auralex Pro Max (just under $350). You might also want to consider getting a wind screen.
Next, here’s a list of some of the most important tips to keep in mind during your session:
- Be cognizant of noises, including your own breathing, arm, and hand noises as you move them on the guitar, and other noises that could come from the chair you’re sitting on, the floor, and so on. These will all contaminate your tracks. Nothing is more agonizing than thinking that your performance and recording were pristine, only to later discover that your stomach rumbled or the chair creaked.
- After you record a track or two, listen to the guitar track for squeaks. Some guitarists’ hands and styles lend themselves to more squeaking than others. Squeaks are hard to avoid altogether, but aside from being aware of them, you can get coated strings that help reduce squeaking. If you’re generally pleased with a performance you record, but it has a few squeaks, write down the times where they occur and then decide whether you’re going to punch in replacement sections or look for a squeakless performance of the section in another part of the song (that you can cut and paste into the squeaky area).
- Remember to re-tune your guitar (and all other instruments) often during the recording process.
- As soon as you think you have recorded an acceptable main acoustic guitar part, throw down a quick reference (scratch) vocal (one or two takes—don’t finesse the performance) to see if the vocals work well with the guitar part. In evaluating their synergy, make sure the guitar is not “stepping” on the vocal (i.e. interfering or drawing attention away from) and that there aren’t any glaring rhythmic or chordal anomalies. Sometimes when you separate the guitar and vocal parts and record them independently, you might alter how you play the guitar part, which makes for a stilted performance. Also, listen to make sure you are not holding out chords or notes too long (or not long enough).
- If your digital audio workstation (DAW) doesn’t automatically save your recordings as they evolve, then you need to remember to click the “save” button early and often.
- If applicable, let the final chord of the song ring out until you can’t hear it anymore. And be ever so quiet as it does. Be sure not to breathe loud or move your hands or body.
- If the song has a fade-out ending, play the fade at least 15 seconds longer than you think you need.
- Before you decide to end your recording session, listen to the track all the way through. It’s easy to lose perspective when you are doing both the engineering and recording. Take notes as to possible EQ modifications you need to make, possible spots you need to punch in, and times and specifics about any performance or recording anomalies that you hear. This way you have a game plan of things to tackle when you return to the project.
As you can see, there are a lot of important details to keep in mind when recording acoustic guitar on your own. But along with those concerns and oversight measures comes an enpowering experience with lots of advantages. Those include the freedom of recording any day and time you’d like without a reservation, deposit, or committing to a minimum block of hours; the ability to leisurely listen and evaluate the quality of various “takes”; experimenting as much as you’d like with altering the position of equipment and recording environment without oversight or added expense; using and comparing different types of mics and guitars, etc. So take your time, enjoy the experience, remember to have fun, and pat yourself on the back every once in a while.
 Jeff S. teaches guitar, ukulele, speaking voice, songwriting, and more in Perth Amboy, NJ, as well as online. Jeff has created and taught songwriting and music business classes at colleges, universities, and music schools throughout the country for many years. Learn more about Jeff here!
Photo by erik forsberg

Suzy S.