
![Guide to Proper Piano Hand Position [Infographic]](/_next/image?url=https%3A%2F%2Ftakelessons.com%2Fblog%2Fwp-content%2Fuploads%2F2015%2F10%2FUntitled-design6.jpg&w=3840&q=75)

Learning the proper piano hand position is essential for both beginner and accomplished piano players. Below piano teacher, Ryan C. shares some tips and exercises on how to perfect your piano hand placement…
If you were to sit down at a piano right now and throw your hands on the keys, how would they land? Would your fingers be curved or flat? How would your wrist look relative to your arm? Would you feel any tension in your shoulder or would you feel relaxed?
Considerations like these are often overlooked by both amateur and accomplished pianists. Perhaps the concept of having a consistent piano hand position was never taught to you or never occurred to you.
Whatever the case may be, having good piano hand placement is extremely important for both aspiring and accomplished pianists.
In this post, we will discuss the importance of proper piano finger position as well as some exercises you can do to perfect your piano hand position.
Let’s get started!
The Importance of Proper Piano Hand Position
Why does good piano hand position matter? So glad you asked! To answer this question, allow me to give you a small glimpse into my history as a pianist. When I first started studying piano at college, I had a teacher who didn’t teach me proper piano hand position.
For a while, this didn’t matter, as I was able to get a satisfactory sounding tone, sense of phrasing, and musicality out of the instrument. As a college level pianist, however, I was required to practice many hours a day; at one point, I was doing 5 hours a day.
Very quickly, my hands and arms would hurt to the point where picking anything up would be painful. At the time, I didn’t know that this pain was caused by poor piano hand placement.
It wasn’t until I came to San Diego State University to further my piano playing, when my piano teacher Dr. Follingstad, immediately began to address and remedy the issues within my piano hand positions.
Good piano hand placement not only prevents injury, but it also allows a pianist to get better tone quality. I remember when I was a beginner and thought that the tone of the piano was unchangeable. I didn’t realize that the position of my hands could absolutely affect the sound coming out of the instrument.
In addition to the previously mentioned benefits, proper piano finger positions allows a pianist to play quicker, with more agility, and with greater accuracy.
What is the Proper Piano Hand Position?
With all of the aforementioned benefits of using a proper piano hand positions, it would seem that the only thing left to do is to learn how to actually do it!
Thankfully, a good piano hand position is actually much easier to learn than many people think! Like any new skill, however, maintaining good piano hand placement requires consistent practice on behalf of the student.
I will be using piano hand positions approaches that have worked for me, specifically that of my teacher Dr. Follingstad, as well as tips from renowned piano teachers like Leschetizky, Dohnanyi, and Alfred Cortot.
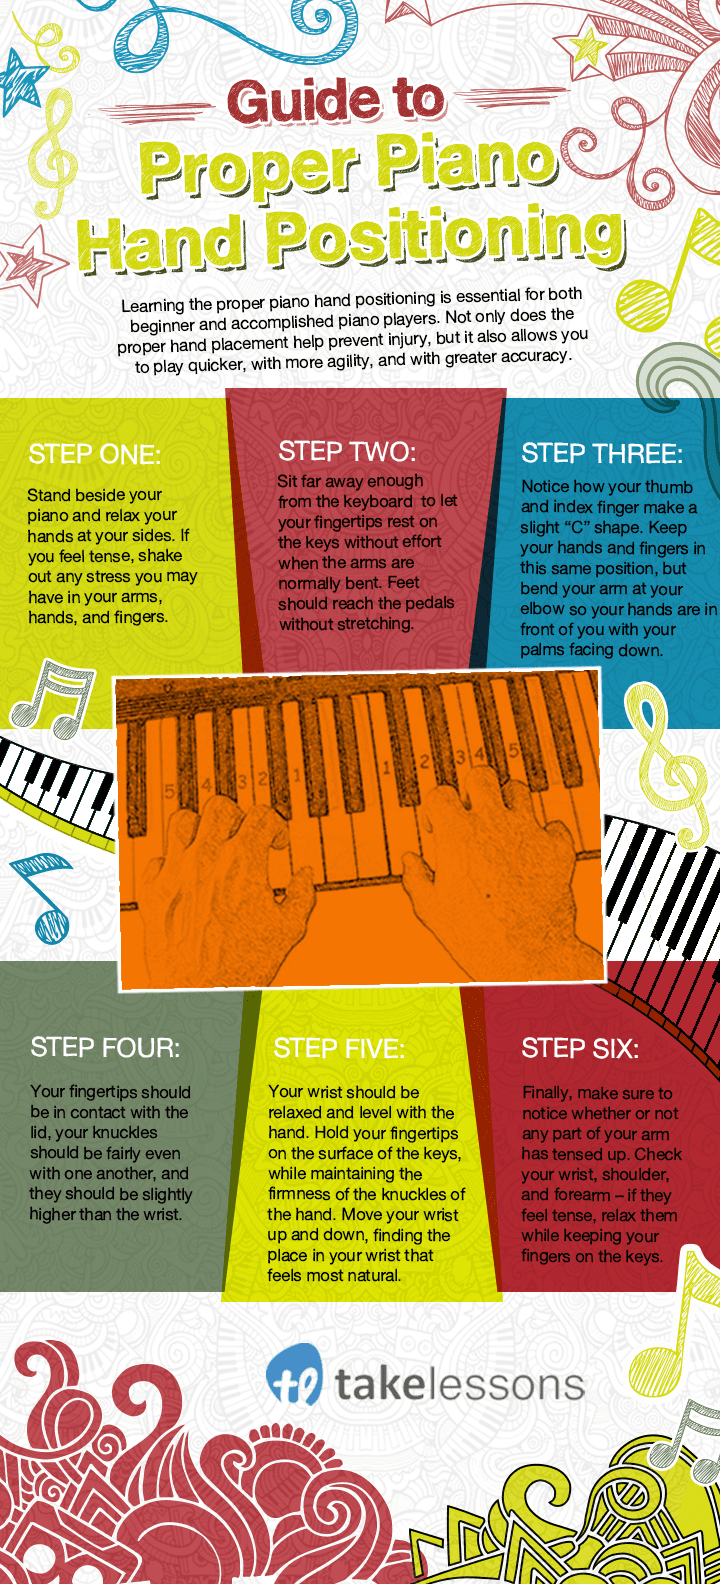
- Step One: To get a natural piano finger position, try standing up beside your piano and relaxing your hands at your sides. If you feel tense, shake out any stress that you may have in your arms, hands, and fingers.
- Step Two: One should sit far enough from the keyboard to let the fingertips rest on the keys without effort when the arms are normally bent, and the feet should reach the pedals without stretching.
- Step Three: Notice how your fingers natural curve in toward your body and how your knuckles curve out slightly away from your body. Also, notice how the thumb and index finger make a slight “C” shape. Keep your hands and fingers in the same position as this, but bend your arm at your elbow so your hands are in front of you with your palms down.
If you’re more of a visual learner, check out this infographic depicting the proper piano hand positions below:
Tips and Exercises for Proper Piano Hand Placement
As previously mentioned, proper piano hand position takes consistent practice to develop.
Cortot, Leschetizky, and Dohnanyi all offer similar techniques when it comes to practicing good piano hand positions. In particular, playing variations of pentascales as chords, while lifting one finger at a time and holding the remaining notes down.
To make this applicable to students, try the following exercise:
Play the notes C, D, E, F, G simultaneously as a chord with your right hand with one finger per key. Slowly let your thumb come up by letting the key lift it. When it reaches the top, don’t let your thumb lose contact with the key. Instead, simply press it down again by using the muscles in your hand.
Try not to let your arm and elbow do the work for you. If you have never done these piano hand exercises before, you may feel as though you can’t push down the keys very hard. This is totally normal! Don’t attempt to push down the keys hard, just focus on making your fingers do the work.
Double check your piano hand position– are the knuckles firm or floppy? Are you tense in your arm or shoulder?
After completing this exercise with your thumb, work your way up your hand by having each finger separately push down its respective key while holding the others down. In this manner, work your way up the hand and back down, eventually switching over to the left hand and doing the same process.
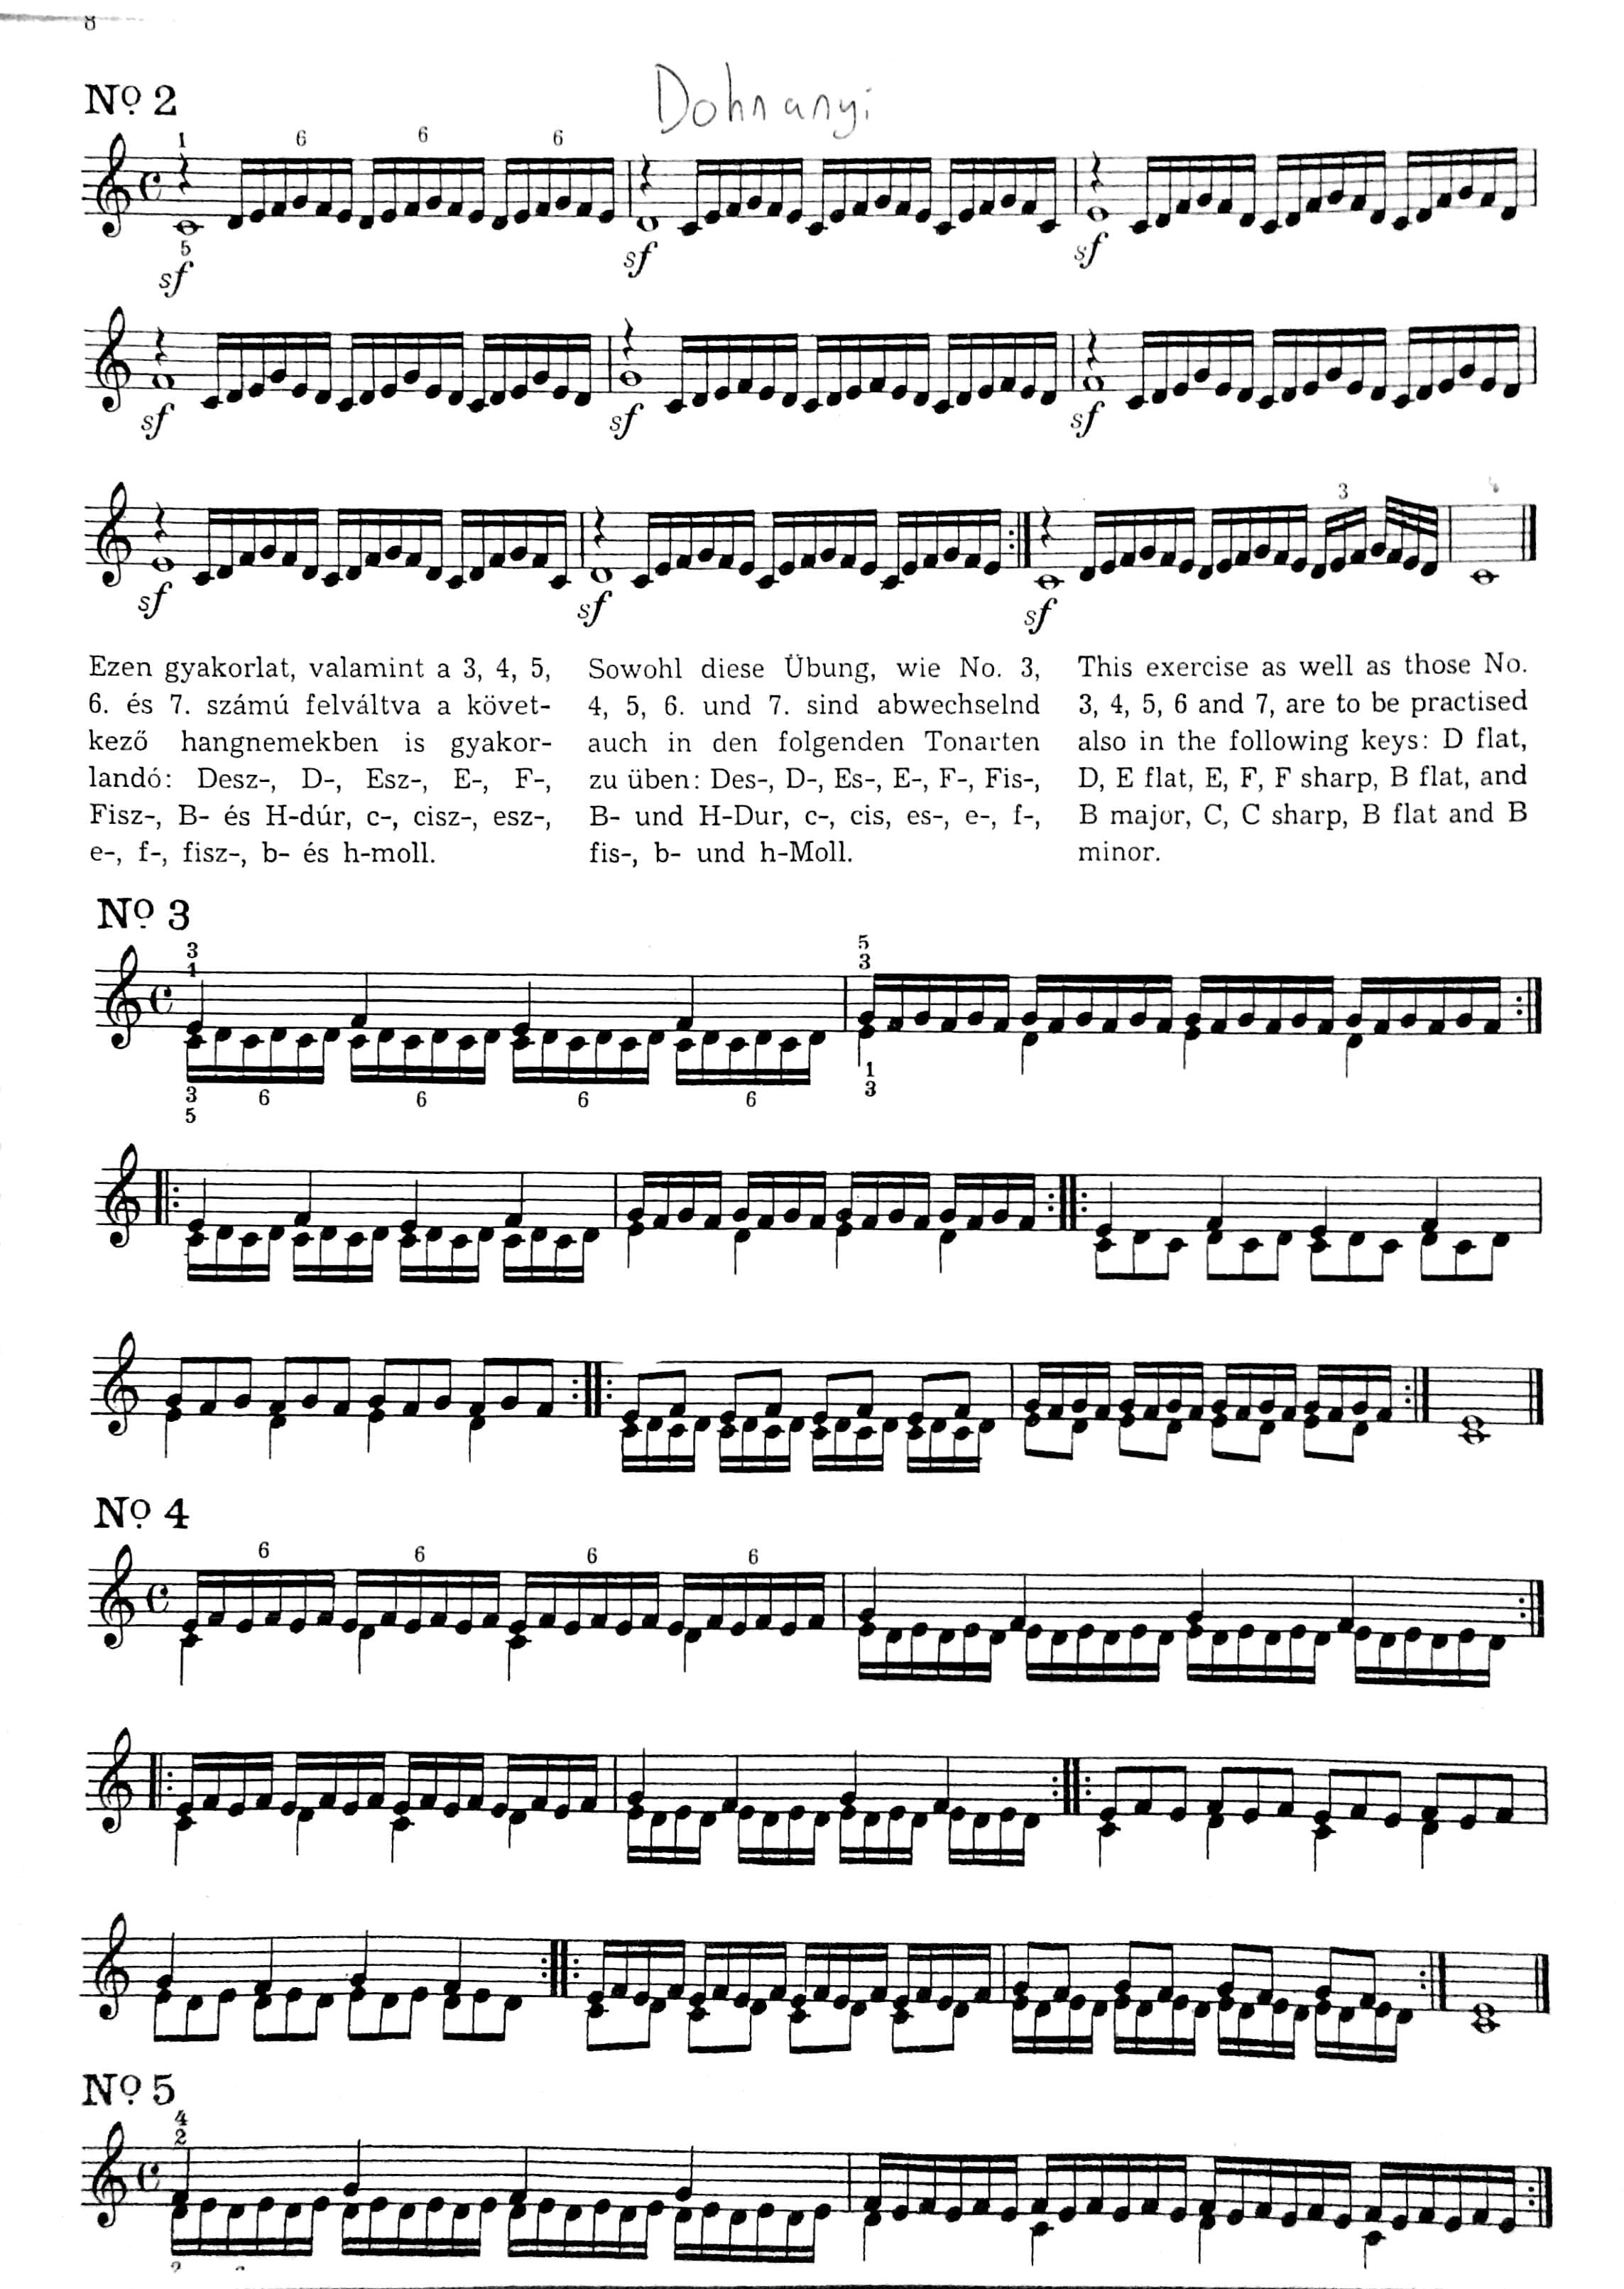
For those who are more adventurous or want some more piano hand exercises to do, try this page of Dohnanyi exercises and see how you do!
Make sure to pay careful attention to the positioning of the hands relative to the wrist, the knuckles, fingers, and so on. Go slow enough that you can do the page without tension.
A good piano hand position is fundamentally important to both aspiring and accomplished pianists.
By following some of the tips above and applying them with consistent practice, you can rapidly improve your ability to play the piano with accuracy and dexterity.
 Post Author: Ryan C.
Ryan C. teaches piano, ear training, and music theory. He is a graduate of San Diego State University with a B.M. in piano performance. Learn more about Ryan here!


Brooke Neuman