


If you want your drums to sound their best, you have to tune them. Proper drum tuning and good drum heads can make even an inexpensive kit sound better. In this video, Edmond, OK drum instructor Tracy D. walks you through the basic techniques to tune your drums…
You’re here because you want to learn how to tune your drums to perfection, and that’s exactly what I’m going to show you. This article and video provide step-by-step instructions to help you tune your drums and achieve the quality sound you desire.
Before we get started, it’s important to understand that this process will take some time, especially if you’re new to tuning, or if you’re outfitting your kit with new drum heads. Remember to be patient. It might be confusing at first, but with a little practice, you’ll be able to tune your drums like a pro (and not make any drum tuning mistakes).
Drum Tuning: Your Step-by-Step Guide
Grab your drum heads and follow this video to learn how to tune each part of your drum kit! For more information on each of the steps, see the tricks and tips below.
Drum Tuning Key
First thing’s first, you’ll need a tuning key to tune your drums. If there’s a Guitar Center near you, make sure to pick one up, or you can buy one online. Luckily, most drum keys are pretty inexpensive, so you may want to invest in more than one (in case you lose your first one). You can also use a drum tuning key to adjust memory locks and some bass pedals, so it’s a necessary tool.
Drum Tuning Tips
If you’re putting new heads on your drum, finger-tighten the tension rods before using your key. Some suggest “seating” the head (placing your hand in the center and putting weight on it). However, you can find some heads, like the Evan’s Level 360, that are pre-made to avoid this.
You may also tune the heads, play on them for a while, and dial (fine tune) them back in. They loosen in a manner similar to new guitar strings.
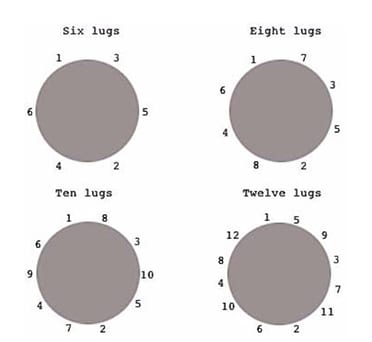
When using your drum key to tighten the tension rods, use a diametric pattern (as illustrated). This retains the evenness of tension across the head. Tighten each rod a quarter turn before dialing to a particular pitch. You should set your drum (including the bass) on a surface that will dampen the head opposite from the one you are currently tuning.
Snare Drum Tuning
You can tune your snare by tightening the lugs on the drum head. Use a diametric pattern (straight across) rather than tuning around the drum head, which can cause uneven tension. Once you’re ready to fine tune your snare, you can move around the drum lug by lug.
Start with the bottom side of the drum; drop your snares and take a stick and place it underneath the drum. Rest your snare on your lap to kill the sound from the bottom head to get a true tone.
To find the fundamental tone of your drum, hit it in the center (open). These snare drum exercises will sound great after proper tuning!
Tuning Toms
The size of your toms and the material can affect the sound. For example, maple toms have a warmer sound.
Tuning toms is similar to snare drum tuning, but some people recommend tuning the bottom head higher than the top in order to get a more controlled sound. For example, if you tune your top head to an A, tune your bottom head to a D.
Bass Drum Tuning
The bass drum is the heartbeat of your kit. Tune your bass drum as low as you can go, generally an octave below your floor tom. Press your hand in the middle of the drum head, then take your key and loosen the lugs. When you notice wrinkles, tighten the lugs back up. Coupled with a good bass drum technique, your bass is going to sound amazing.
Note: You may have to plug your tuner into an external speaker to pick up any note below C4.
Drum Tuning Intervals
You have several options for drum tuning intervals. You may choose to tune the toms in 4ths (from the bottom). These pitches will be the fundamental tone for the drum. For example, my kit is tuned as follows:
14″ tom= E2, 82 Hz
12″ tom=A2, 110 Hz
10″ tom=D3, 147 Hz
8″ tom= G3, 196 Hz
Snare= G3, 196 Hz (snare side) B – batter
Kick =E1, 41 Hz, an octave below my floor tom
You can also dial your kick just until the wrinkles disappear (rather than tuning to a specific pitch). You can also tune toms to 3rds, etc. This isn’t set in stone — once you understand the drum-tuning process, you’ll be able to tune your drums to your preference.
Batter to Resonant Head Ratios
The tuning of the batter (top) heads in relation to the resonant (bottom) heads will affect the resonance and decay. If both heads are tuned to the same frequency, the drum will have maximum resonance. If the resonant head is tuned higher than the batter, the sound will be more controlled.
Many drum experts recommend tuning the resonant head to a 4th above the batter. If the resonant head is tuned lower than the batter, the sound will have more attack (or a doppler/descending effect).
Drum Tuning Apps and Tools
The following apps and tools can help you tune your drums to a specific pitch or frequency.
DrumDial Drum Tuner
DrumDial drum tuners let you measure the tension of your drum head so you can tune your drums with precision. If you want to buy a DrumDial or learn more about how the tuners work, check out the DrumDial website.
tune-bot Drum Tuner
This device enables you to tune your drums to specific notes and then match the lug pitches accordingly. The tune-bot also allows you to save your drum tuning settings.
insTuner
This is the app I use in the video. insTuner is a chromatic tuner, which means it recognizes the 12 chromatic steps on the scale and can be used to tune any instrument.
iDrumTune
This drum tuning app analyzes your drum sound and measures the drum head vibration frequency. Want to see for yourself? You can download it from the iTunes app store for $4.99.
Fine Tuning or “Dialing In”
If you’re not using a specific tuning tool for measuring lug pitches or tension, you can use your ears/tone generator for the fine tuning. To eliminate overtones, place your index finger lightly in the center of the head. Tap your stick lightly about an inch or so from each lug to gauge the evenness of tone, and adjust accordingly.
You should turn your key in very small increments at this point in order to avoid over-tightening. In my experience, the floor tom has proven to be a bit finicky, so it may require a bit more patience on your part. It helps to know how often you should tune your drums.
Now you have a starting point to achieve a sweet-sounding kit! Remember to be patient with the process. With practice, you’ll become more proficient, and the process will be smoother and easier. Experiment until you find your sound, and most importantly, have fun!
If you have any questions about drum tuning, let us know in the comments below, or ask your drum teacher at your next lesson!
 Post Author: Tracy D.
Tracy D. teaches percussion and drum lessons in Edmond, OK, as well as online. She has been playing the drums with various bands for more than 13 years. Tracy earned her Bachelor’s in Music Education and has played with the OKC Community Orchestra since 2009. Learn more about Tracy here!

Maile Proctor