
 Many guitarists have a tendency to focus most of their practice time and energy on left-hand fretting technique. Although the left hand is very important, mastering different rhythms and guitar strum patterns with your right hand adds a whole new dimension to your guitar playing.
Understanding Guitar Strum Patterns
Start by playing a simple chord progression. Ideally, you should be able to play through the chords without looking at the fingers on your left hand. Starting with a simple progression allows you to focus your attention and energy on your right hand. Make sure you have the proper grip on your pick and practice strumming downwards on each chord four times, and then changing chords.
As you’re counting to four, strum once for each count and then repeat counting to four again on the next chord. Once you feel comfortable playing this rhythm using downstrokes, try the same thing using up strokes, strumming from the high E up toward your low E.
Check out this helpful tutorial for an example of some basic strumming patterns to start with.
Most strumming patterns are composed of down strokes and up strokes. You might see a strum pattern indicated on guitar tabs or sheet music with up and down arrows under or above the staff, U’s and D’s under or above the staff, or with strum notation as shown in the chart below:

The upside down U shape indicates a down stroke, and the V shape is an up stroke. As you can see, when it comes to strum patterns, guitar notation is a little all over the place. Do a quick web search for strumming patterns on guitar and you will likely run across all of these notation systems. It’s important to be able to recognize each of them, as you will probably continue to come across each of them.
Although notation is variable, keep this constant in mind: all of these different types of notations represent two basic things, down strokes and up strokes. Combining up and down strokes in different rhythms is the key to creating most strum patterns.
To get started, let’s try the strum pattern shown in the chart above. Each measure is four beats. The single-stemmed notes you see are quarter notes. Each quarter note counts as one beat.
The notes that are connected at the bottom are eighth notes. Each eighth note takes half the amount of time to play as a quarter note. When you are counting these notes, you will say “and.” For example, to count the measures above, you’ll say, “One, two, three and four.” Imagine that there is an “and” between every number you say. When you strum this pattern, you will strum: down, down, down, up, down.
Alternating Bass Guitar Strum Patterns
Some guitar strum patterns will also incorporate a bass note plucked individually. These patterns are called alternating bass patterns, because they alternate bass notes, or the root note of the chord, with complete strums of the full chord. You will often hear this technique used in country and folk music.
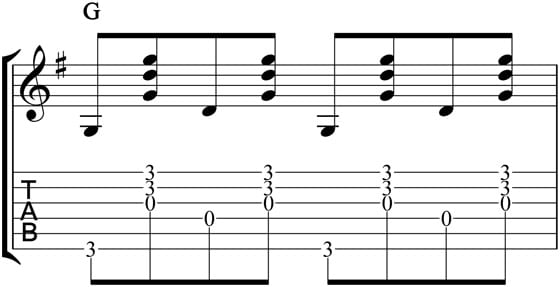
One very common alternating bass strum pattern involves plucking downward on the root note of the chord and then strumming upward on the full chord. Here’s what this pattern looks like using the G-chord, transcribed to both guitar tabs and traditional sheet music:
Some alternating bass guitar rhythms involve more strumming. Check out this variation on the first alternating bass pattern you learned. Note that the patterns we’ve looked at so far have been in 4/4 time and this one is in 3/3, meaning there are three beats per measure.
You’ll notice that this strum pattern has a swinging, waltz feeling to it, while the 4/4 patterns can feel more like a march or a rock beat, depending on the strum pattern you use.
Adding Other Elements
There’s more to great rhythm guitar playing than just strumming. Sometimes, the most interesting patterns and grooves incorporate pauses and muting to add interest and percussive qualities to your playing.
The simplest element to start adding to your guitar strumming are pauses. Start with a straight ahead, 4/4 beat where you are playing one down stroke for each count of four. Now practice strumming just on the one, two, and four. What happens if you change it up and just strum on the two and three? Get creative and get comfortable with not having to fill every second of a song with your guitar.
Muting your strings is another great way to add some color to strum patterns. Let’s take a look at the two types of muting and then learn how to incorporate them into a strumming pattern.
Left-Hand Muting Technique
Muting gives your guitar a crisper, crunchier sound. To mute your strings using your left hand, just relax your fretting fingers so that instead of holding the note down cleanly, they are just deadening the vibration of the string. To mute all the strings on your guitar, lay your index finger across the fretboard.
Try playing a 4/4 strum pattern with just one down stroke per count. Now alternate fretting and muting the chord, one strum pressing the strings down fully with your left hand and on the next strum mute the strings. Get used to hearing and feeling the difference.
Right-Hand Muting or Palm Muting
You can also mute your guitar strings using your right, strumming hand. Allow the side of your palm to rest gently on the strings as you strum. This technique is great for muting open strings or creating a softer sound. Practice alternating full strums with palm-muted strums.
Here’s what muting looks like on guitar tabs and other notation:
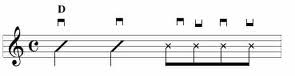 The X’s indicate muted strums. To play this strum pattern, you’ll start with down strokes on the one and tw0, then play four muted strokes, alternating up and down, on the “three-and-four-and.”
Now that you’re familiar with some basic guitar strum patterns, and know how to read them, you can learn many more either by looking at guitar tabs, mimicking what you hear when you listen to music, or by taking private lessons with a guitar teacher. The right guitar teacher will give you personal attention and help you progress by leaps and bounds. Find out more about guitar lessons or search for your perfect teacher today!

Megan L.